
How to Fix a Foaming Pump That Is Not Working
Quick answer: Remove the pump from the bottle, rinse the dip tube, and soak only the pump’s liquid-contact parts in warm—not boiling—water for 10–15 minutes. Pump clean warm water through the mechanism until it flows freely, then let the parts dry and reinstall the pump tightly. Prime it with 5–10 slow, full strokes. If it still does not work, check for an over-thick formula, a blocked air inlet, a loose or split dip tube, a missing gasket, damaged mesh, or a failed spring. Replace the pump if its spring, piston, valve, seal or mesh is damaged.
Do not force the actuator, push a needle deep into the nozzle, use boiling water, or pry open a crimped or welded pump. These actions can deform the parts, damage the fine mesh or create a leak. For cosmetics and commercial products, do not dilute the formula with tap water unless the formulator has approved the new composition and preservation system.
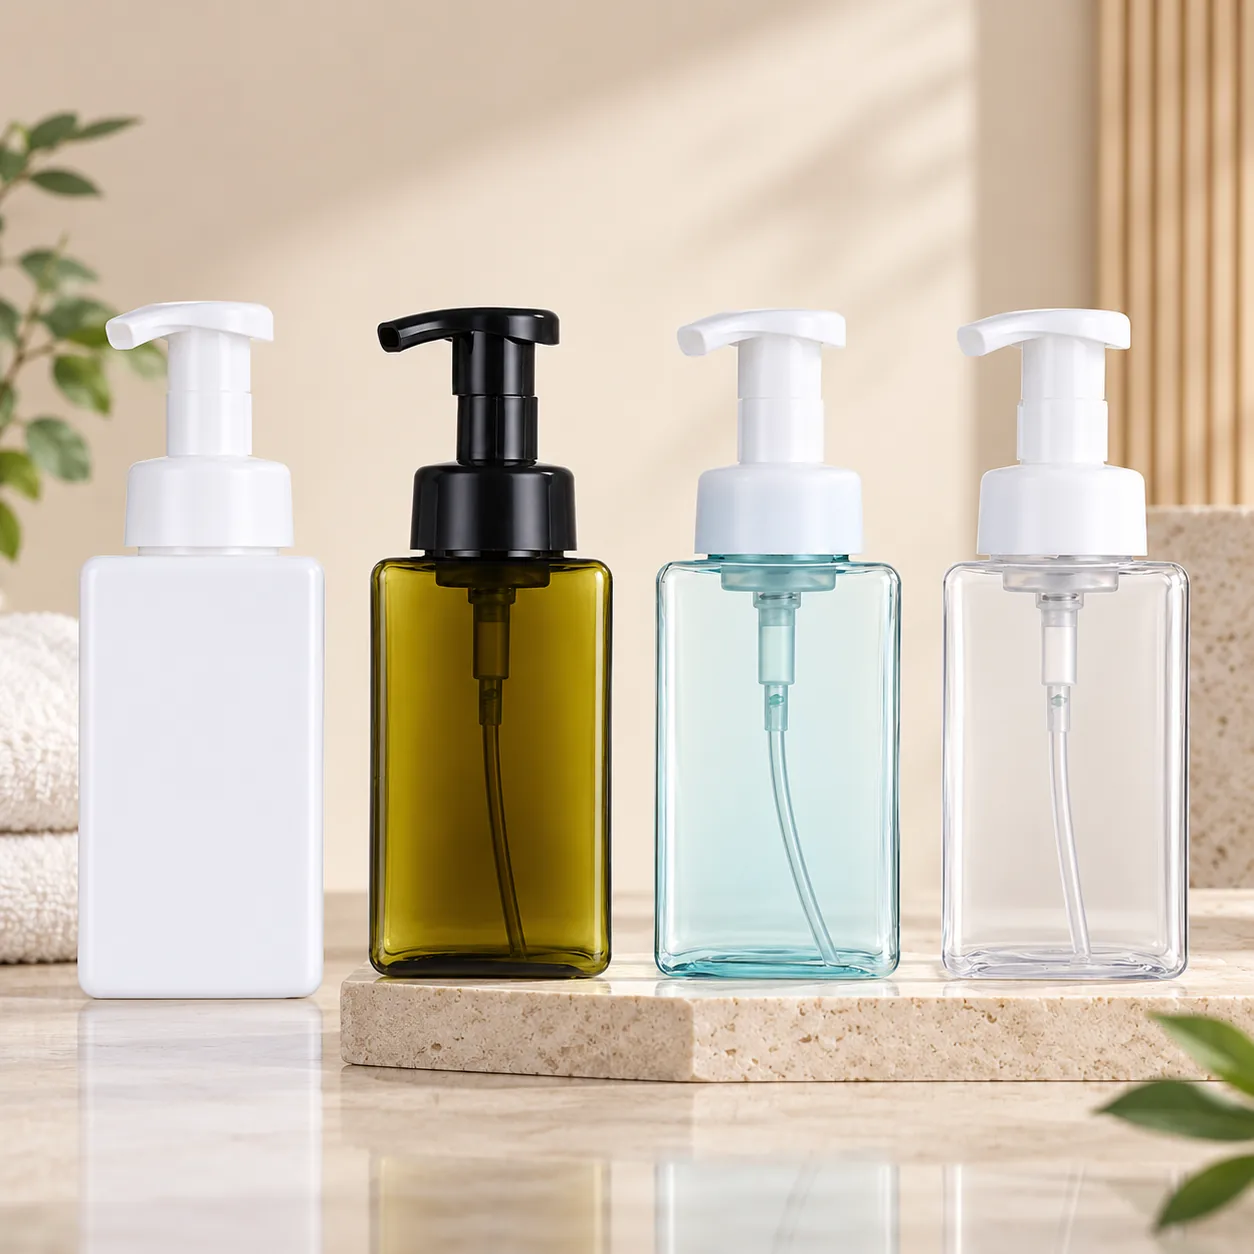
If you are selecting packaging for a new product rather than repairing a household dispenser, see Boyu Packaging’s foam pump bottle range and detailed guide to how a foam pump bottle works. You can also review custom plastic cosmetic bottles or request a compatible bottle-and-pump sample.
1. Five-Minute Foaming Pump Fix
- Unlock the pump. Some foamers lock by turning the actuator. Hold the collar and turn the pump head in the direction indicated by the lock symbol. Remove any shipping clip or overcap.
- Check the liquid. A foam pump needs a low-viscosity, foamable formula. Thick gel, lotion, particles, glitter, undissolved powder and some oils can block the mesh or prevent air–liquid mixing.
- Tighten the collar. A loose closure or displaced gasket can let air enter at the wrong point, so the pump cannot build the pressure needed to draw liquid.
- Prime slowly. Keep the bottle upright and press the actuator fully 5–10 times. Allow it to return completely after every stroke.
- Flush the pump. If it remains blocked, remove the pump, soak the liquid-contact end in warm water, and pump clean water through it until the outlet runs clear.
This sequence fixes the most common issues: a locked actuator, loss of prime, dried product in the nozzle or mesh, an incorrectly fitted closure, and a formula that cannot move through the pump.
2. How Does a Foaming Pump Work?
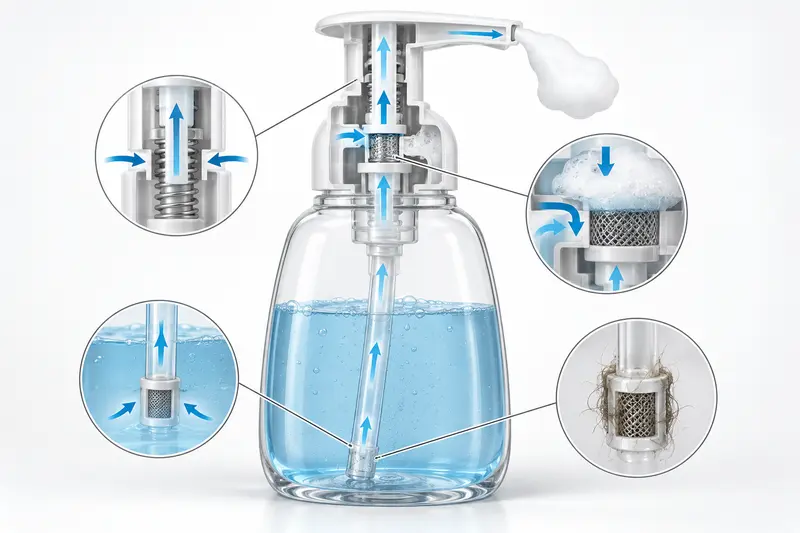 A foam pump draws liquid and air into separate chambers, mixes them, and pushes the mixture through a fine mesh to create foam.
A manual foam pump does not usually store finished foam inside the bottle. The bottle contains a liquid formula. Pressing the actuator moves separate liquid and air pistons. Liquid rises through the dip tube while air enters through an air path. Both streams meet in a mixing chamber and pass through one or more fine mesh screens. The mesh breaks the mixture into small bubbles, producing foam at the nozzle.
When the actuator is released, the return spring moves the mechanism upward. One-way valves help refill the liquid and air chambers for the next stroke. This explains why several apparently small problems can stop the dispenser:
- A blocked liquid path prevents product from reaching the chamber.
- A blocked air inlet produces wet, weak foam or liquid only.
- A clogged or damaged mesh changes bubble size or stops output.
- A leaking seal prevents the pump from building suction.
- A stuck spring or piston prevents the actuator from returning.
3. Common Foaming Pump Problems and How to Fix Them
| Symptom | Likely cause | Recommended fix |
|---|---|---|
| Nothing comes out | Pump locked, no prime, empty bottle, blocked tube/nozzle, loose tube or air leak | Unlock, refill correctly, tighten the collar, prime slowly, inspect the dip tube and flush with warm water |
| Liquid comes out but does not foam | Blocked air inlet, clogged/damaged mesh, unsuitable formula or incorrect viscosity | Clean the air path and mesh; test a purpose-made foaming formula; replace a damaged pump |
| Foam is watery or inconsistent | Formula too thin, partial air blockage, low fill, pump not fully returning or unstable formulation | Use the approved formula, clean the pump, allow full return between strokes and test another pump |
| Pump is hard to press | Dried product, thick formula, swollen seal, damaged piston or distorted parts | Stop forcing it; soak and flush. Replace the pump if resistance remains |
| Actuator stays down | Stuck or corroded spring, dried product around the stem, damaged piston | Clean around the stem and flush. Replace if the spring does not recover |
| Pump works only when tilted | Dip tube too short, bent, loose, split or cut incorrectly | Reconnect or replace the tube; use the correct length with an angled bottom cut |
| Leak around the neck | Loose collar, cross-threading, missing/damaged gasket or incompatible neck finish | Clean the threads, seat the gasket, reinstall straight and use a pump matching the bottle neck |
| Leak from the nozzle | Residual pressure, worn valve, product expansion, bottle stored on its side | Store upright, clean the nozzle and replace the pump if dripping continues |
| Pump stops working after refill | Airlock/loss of prime, overfilled bottle, incompatible refill or contamination | Leave headspace, tighten the closure, prime slowly and use the specified refill |
The Pump Does Not Dispense Anything
First confirm that the actuator is unlocked and the dip tube reaches the liquid. A new or recently refilled pump may contain air, so it can require several full strokes to prime. If the dip tube is detached, push it firmly back onto the pump body. Replace a split tube because even a small crack above the liquid line can break suction.
The Pump Dispenses Liquid Instead of Foam
This usually points to the air side of the system, the mesh or the formula. Clean dried product around the air inlet and flush the pump. If another known-compatible foaming liquid works in the same pump, the original formula is the likely cause. If neither formula produces foam, the mesh, air piston or internal valve may be damaged.
The Pump Is Stuck or Returns Slowly
Dried product around the stem can create friction. Rinse the exterior, then flush the mechanism with warm water. Do not keep pressing harder: excessive force can bend the stem, tear a seal or collapse the mesh holder. If the actuator remains down after cleaning, replace the pump.
The Bottle Leaks
Identify the exact leak path. Product around the collar suggests a gasket, torque or thread problem; product at the nozzle suggests an internal valve or pressure problem; a wet bottle wall may indicate a crack. Wipe everything dry, reinstall the pump straight, and observe the filled bottle upright and on its side over a protected surface. Do not continue using cracked packaging.
4. How to Clean and Unclog a Foaming Pump
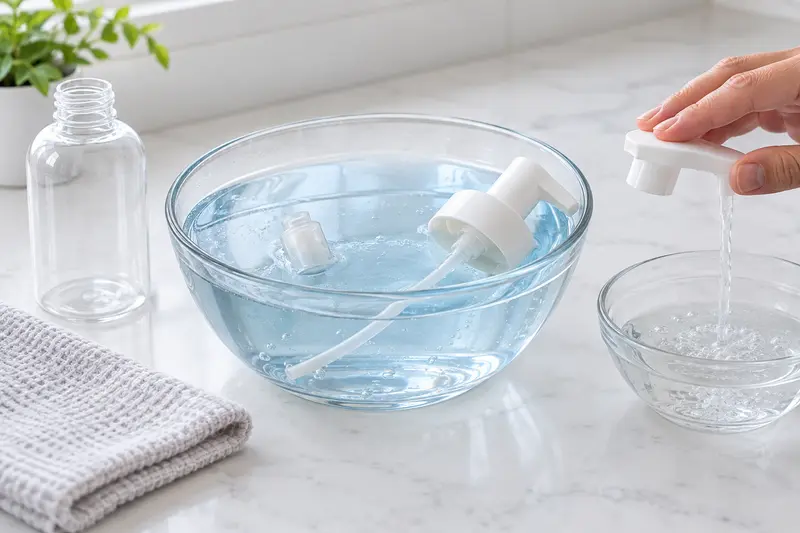 Flush warm water through the intact pump mechanism to loosen dried product and clear the liquid path.
- Wash and dry your hands. Protect the work surface.
- Unscrew the complete pump collar counterclockwise. Lift it slowly so the dip tube drains into the bottle.
- Rinse visible product from the dip tube, pump body and nozzle with warm water.
- Place the dip tube and lower pump body in a container of clean warm water. Avoid submerging decorative metal collars or components that the manufacturer says must remain dry.
- Operate the pump repeatedly so warm water travels through the liquid path and exits the nozzle.
- Soak for 10–15 minutes if dried soap remains, then flush again until the water is clear and the actuator returns normally.
- Shake off water and let the assembly dry thoroughly in a clean area before refilling.
Do not use: boiling water, strong solvents, bleach, sharp wire or aggressive tools unless the pump manufacturer specifically approves them. Heat can distort plastic, chemicals can swell seals, and a needle can puncture a valve or mesh. Many consumer foam pumps are snap-fitted and are not designed for full disassembly.
5. How to Replace a Foaming Pump Head
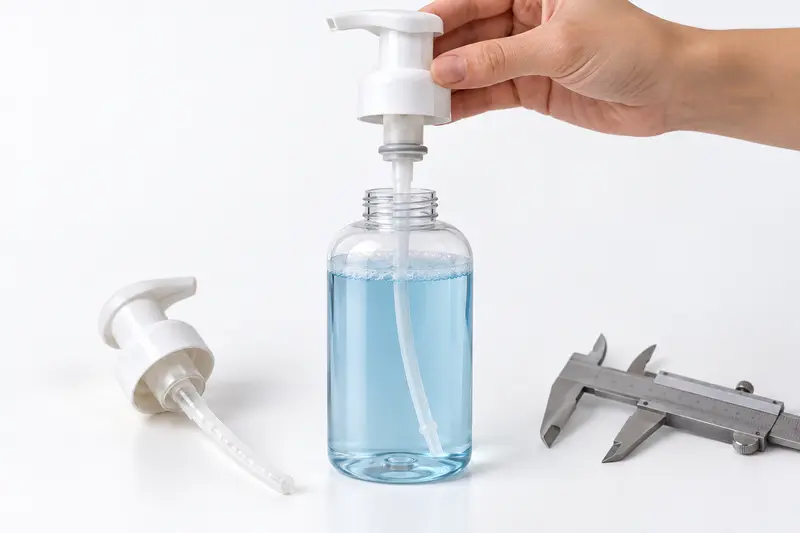 Match the bottle neck, thread, gasket, foam output and dip-tube length before installing a replacement pump.
A replacement must match more than the visible diameter. “It screws on” does not guarantee a reliable seal or correct dispensing.
- Identify the neck finish. Confirm the bottle’s neck diameter, thread style and finish specification. Foam pumps often use larger necks to accommodate their air and liquid chambers.
- Match the closure and gasket. The thread, sealing surface and liner/gasket must suit the bottle neck and formula.
- Confirm the dip-tube length. Measure from the underside of the gasket to near the bottle’s internal base. The tube should reach the product without pressing hard against the bottom. An angled cut helps prevent the opening from sealing against the base.
- Check pump output and foam style. Different mesh and air–liquid ratios create different foam density and dose per stroke.
- Install cleanly. Insert the tube without touching contaminated surfaces, align the closure and tighten it evenly. Do not cross-thread or overtighten.
- Prime and test. Press slowly until foam appears, then check output, recovery and leakage.
For commercial packaging, test several assembled samples with the actual formula before approving a replacement pump. Compatibility testing should cover dispensing, leakage, repeated actuation, storage orientation and relevant temperature conditions.
6. How to Refill a Foaming Pump Bottle Correctly
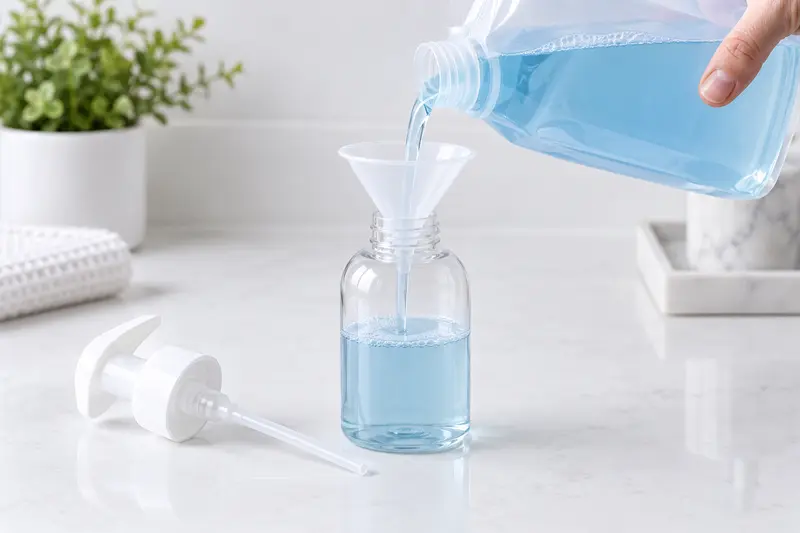 Use a clean bottle and compatible foaming refill, and leave enough headspace for the pump body.
- Use the correct refill. Choose a product specifically designed for a foaming dispenser or use the product manufacturer’s exact instructions.
- Do not top off old product. Empty the bottle first. Mixing old and new batches can introduce contamination and makes traceability difficult.
- Clean and dry reusable packaging. Follow the brand’s cleaning directions. Residual water can change product concentration and preservation.
- Leave headspace. Do not fill to the rim. Leave enough space for the pump body and to avoid overflow when the closure is inserted.
- Reinstall the pump. Ensure the gasket is present, insert the dip tube, and tighten the collar straight and evenly.
- Prime upright. Use slow, complete strokes and allow full actuator return.
Should You Dilute Regular Liquid Soap?
Many household guides suggest roughly one part liquid soap to three or four parts water as a starting point. That may make some household soaps thin enough to foam, but it is not a universal specification. Soap chemistry, viscosity, surfactants and pump design vary widely.
Safety note: Do not casually add water to cosmetics, facial cleansers, preserved personal-care products or products intended for sale. The FDA warns that adding water can introduce microorganisms and dilute preservatives. Brands should have a formulator establish the final foamable formula, preservation system and compatibility test plan. Healthcare facilities should follow their infection-control procedures and should not top off partially empty dispensers.
7. Correct Use and Preventive Care
- Keep the bottle upright during dispensing unless it is specifically designed for inverted use.
- Press the actuator straight down rather than pushing it sideways.
- Use full, steady strokes and let the pump return completely.
- Keep the outlet clean; wipe away product before it dries.
- Do not add particles, powders, glitter or thickening ingredients that can block the mesh.
- Avoid storing the bottle in excessive heat or direct sunlight.
- Use a transport lock, clip or overcap during shipping when the package design provides one.
- Do not mix incompatible products in the same bottle.
8. When Should You Replace the Pump Instead of Repairing It?
Replace the pump when:
- the spring no longer returns after cleaning;
- the stem, collar, thread or pump body is cracked;
- the gasket is missing, permanently compressed or swollen;
- the mesh is torn, deformed or cannot be cleared;
- the nozzle continues to leak after correct installation;
- the pump has contacted a contaminated or incompatible product;
- the packaging is a sealed, disposable design not intended for service.
For a consumer bottle, replacement is often safer and more reliable than rebuilding an internal pump. For a B2B packaging project, recurring pump failures should trigger a root-cause review of the formula, neck match, gasket, dip tube, assembly torque, storage conditions and pump specification—not simply repeated pump replacement.
9. Frequently Asked Questions
Why is my foaming soap pump not working after a refill?
It may have lost its prime, been overfilled, or received a refill that is too thick. Tighten the pump, leave suitable headspace and prime it with slow, full strokes. Flush the pump if the old product dried inside it.
Can I clean a foam pump with vinegar?
Warm water is the safer first choice. Vinegar may not be compatible with every metal spring, seal, decorative finish or filled product. Use it only if the pump manufacturer recommends it.
Can a regular lotion pump replace a foam pump?
A regular lotion pump can dispense liquid but will not normally create foam because it lacks the same air chamber and foaming mesh. It must also match the bottle’s neck finish and formula.
Why does my foam pump produce large bubbles?
Possible causes include partial mesh blockage, an unstable formula, an incorrect air–liquid ratio or internal wear. Clean the pump and compare its output with a new pump using the same liquid.
How many times should I press a new foam pump?
Five to ten slow, complete strokes are often enough to prime a manual pump, although the actual number depends on dip-tube length, pump chamber and fill level.
Can a foam pump be reused?
Only if the package is intended for reuse, remains undamaged, can be cleaned and dried properly, and is refilled with a compatible product. Hygiene, pump life and the product manufacturer’s directions take priority.
Need a Reliable Foam Pump Bottle?
Boyu Packaging supplies custom foam pump bottles for facial cleanser, hand wash, baby care and personal-care formulas. Send us your formula type, capacity, neck requirement, pump output, color, decoration and quantity so we can recommend a suitable package and arrange compatibility samples. Contact Boyu Packaging for a quotation.
10. References
- Google Patents — Foam Dispenser, WO2011142874A1. Air chamber, liquid chamber, valves, mixing and mesh-screen structure.
- Google Patents — Liquid Dispenser for Dispensing Foam, US6082586A. Air-tight sealing and foam-dispensing mechanism.
- U.S. FDA — Microbiological Safety and Cosmetics. Guidance concerning water addition, microorganisms and preservative dilution.
- U.S. CDC — Guideline for Hand Hygiene in Health-Care Settings. Recommendation not to top off partially empty soap dispensers.
- AmeraProducts — How to Fix a Soap Dispenser. Warm-water soaking, flushing, priming, tube inspection and replacement guidance.
- The Plant Pioneer — How to Take Apart and Clean Foaming Soap Pumps. Mesh inspection and cleaning considerations.
- Kuishi — A Complete Guide to Foaming Soap Dispensers. Consumer refill ratios and the importance of leaving headspace; ratios are not universal commercial formulation specifications.
 English
  Español de Argentina
  Русский
  Italiano
  日本語
日本語  한국어
한국어  العربية
  Français
  Deutsch