Direct answer: silk screen printing on bottles works by forcing ink through the open areas of a stencilled mesh while a cylindrical bottle rotates in step with the screen. A durable result does not come from ink alone. It requires the correct bottle surface, pretreatment, ink system, stencil, fixture, cure and verification test. Glass usually needs exceptionally clean surfaces and may need flame or silane-based pretreatment; PE and PP plastics normally need measured surface activation. Temperature and humidity must follow the selected ink’s technical data sheet—not a single universal number.
In this guide
How does silk screen printing on bottles work?
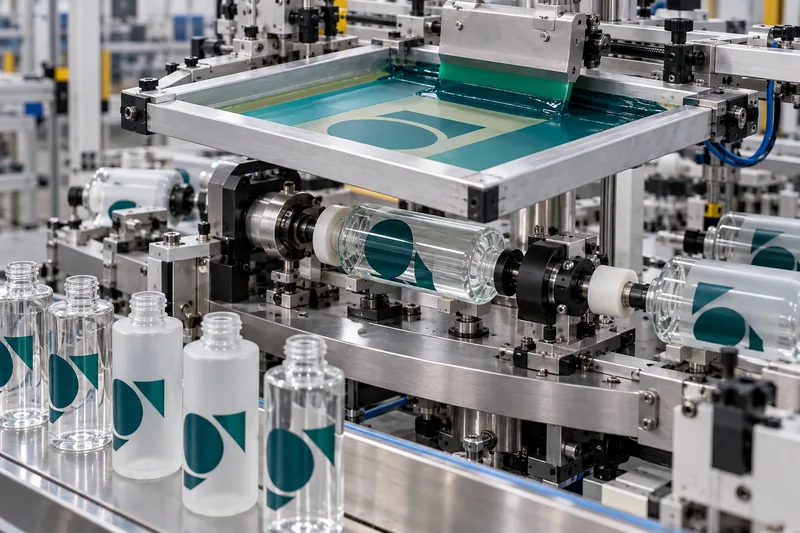
Modern “silk screen” meshes are normally synthetic, but the traditional name remains common. Artwork is separated by color and used to create a stencil on a tensioned mesh. Image areas remain open; non-image areas are blocked. During printing, a polyurethane squeegee presses ink through the open mesh and onto the bottle.
Flat objects can remain stationary, but round bottles require synchronized motion. A mandrel, rollers or a fixture locates the bottle. As the screen travels, the bottle rotates at a matching surface speed. If the bottle slips, the circumference varies, or the fixture is eccentric, lines double, letters stretch and later colors no longer register.
Ink then has to change from a printable liquid film into a resistant solid film. Depending on the ink, this may happen by UV or UV-LED polymerisation, solvent evaporation, chemical crosslinking, thermal baking, or a combination. “Dry to the touch” is not the same as fully cured or chemically resistant.
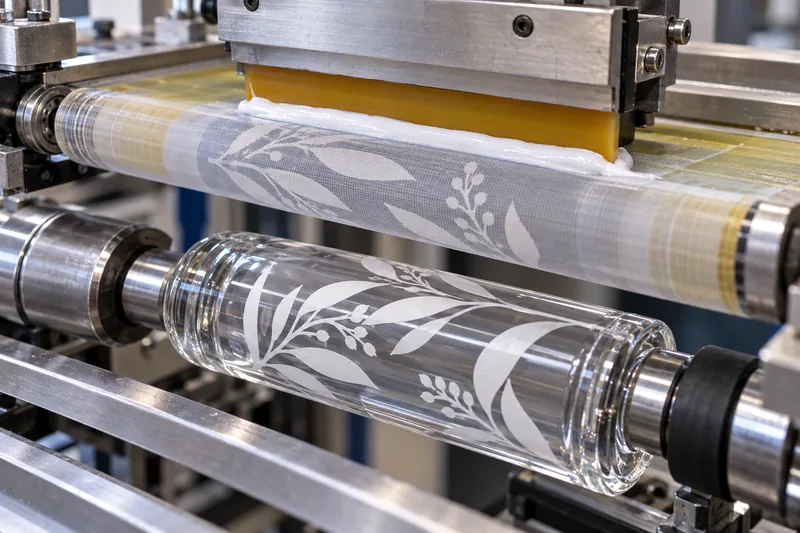
The complete bottle screen-printing process
1. Define the bottle and end-use specification
The printer should know the substrate—not merely “plastic” or “glass.” For plastic this includes resin grade, recycled-content level, colorant, mould release and any coating. For glass it includes cold-end coating, spray color, frosting and other decoration under the print. The team should also define the filled formula, expected shelf life, bathroom or travel exposure, target markets, and whether the bottle will be squeezed, washed or handled with alcohol, oil or sunscreen on the user’s hands.
2. Separate artwork and engineer the printable area
Each spot color normally needs its own artwork separation, screen and print station or pass. Fine reversed text, halftones and wraparound graphics require more control than a large solid logo. The decorated area must avoid severe taper, mould parting lines, embossing and abrupt diameter changes. A seam gap is often required because a cylindrical screen cannot print perfectly through its own start-and-stop overlap.
3. Prepare the screen and fixture
Mesh count, stencil thickness, tension and squeegee hardness determine ink-film thickness and image definition. The fixture must locate the bottle from repeatable datums and support it without deformation. The printer should qualify the real production bottle, not an ideal drawing, because wall thickness, ovality and base push-up can change rotation.
4. Clean and pretreat
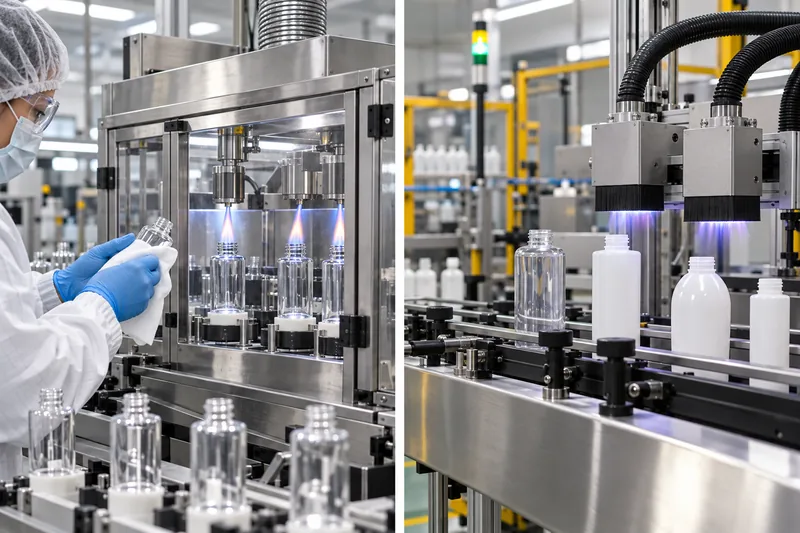
Dust, oil, silicone, fingerprints, condensation and mould-release residue can produce pinholes or total adhesion failure. Cleaning and pretreatment are separate operations: cleaning removes contamination; flame, corona, plasma or chemical treatment changes the surface so the ink can wet and bond. Surface energy should be measured near the printing step because the effect of treatment can decay during storage.
5. Mix and condition the ink
Bring ink and bottles into the approved room-temperature range, mix pigment thoroughly and add only the reducer, hardener or adhesion promoter permitted by the ink supplier. Record batch number, mixing ratio, time and pot-life expiry. Uncontrolled thinning may improve printability for a few minutes while reducing opacity, cure, edge definition and chemical resistance.
6. Print, flash cure and register
Approve a first-off sample for position, color, opacity, edge quality and seam. Multicolor bottles need repeatable orientation and sufficient intermediate cure so the next screen does not lift or smear the previous color. Excessive cure between colors can also reduce intercoat adhesion in some UV systems; the ink supplier’s overprint window matters.
7. Final cure, condition and verify
UV intensity, dose, lamp spectrum and distance—or oven time and bottle temperature—must be measured, not guessed from conveyor speed alone. Allow the print to cool and, for two-component or solvent systems, wait for the specified crosslinking period before final testing. Nazdar notes, for example, that its 5100 solvent-based container ink reaches final properties five to seven days after drying. That delay is specific to the product, but it illustrates why immediate tape testing can misrepresent mature performance.
Glass vs. plastic bottle screen printing
The printing mechanics are similar, but the bonding problem is different. A glass bottle can tolerate some high-temperature cures that would distort plastic; low-surface-energy polyolefins need activation; and a painted glass bottle must be treated as a coated substrate because the ink bonds to the paint, not directly to glass.
| Decision point | What changes between glass and plastic |
|---|---|
| Surface | Glass: chemically receptive when clean, but cold-end coatings, silicone, grease and spray paint may block bonding. Plastic: PET, HDPE, LDPE and PP behave differently; PP and PE commonly require activation. |
| Pretreatment | Glass: cleaning plus flame, silane or Pyrosil-type treatment may be specified for certain ink/coating systems. Plastic: controlled flame, corona or plasma treatment is common, with dyne level verified before printing. |
| Ink and cure | Glass: UV, two-component and heat-cured glass inks are available. Plastic: ink must match the exact resin and remain flexible enough for bottle squeeze; cure temperature must not deform the package. |
| Main failure | Glass: contamination or incompatible coating/ink. Plastic: insufficient surface energy, treatment decay, resin variation, bottle flexing or heat distortion. |
| Validation | Both require adhesion, abrasion and formula-resistance testing. Plastic also needs squeeze/flex testing when relevant; glass decoration should be checked after thermal and coating processes. |
For a wider view of the substrate itself, compare Boyu’s cosmetic glass packaging and plastic cosmetic bottle options. If the bottle is still being developed, the glass perfume bottle manufacturing process explains why dimensional variation and surface coatings must be controlled before decoration.
How many colors can be printed on a bottle?
There is no universal maximum. One spot color is the simplest and most tolerant. Two or three spot colors are routine on suitable equipment, while four or more can be produced when the machine has enough stations, the bottle has a reliable orientation feature and the artwork accepts the available registration tolerance. Each spot color usually requires a separate screen and pass.
Four-color process screen printing also exists—ISO 12647-5 addresses process control for four-color screen printing—but that standard is not a bottle-specific approval. On a small curved bottle, halftone dots, taper, seam position and registration can make process work less forgiving than spot-color graphics. Brands seeking photographic effects should compare screen printing with heat transfer, pressure-sensitive labels or direct digital printing rather than assuming more screens are always better.
Artwork rule that prevents costly surprises
Ask the supplier to mark the printable circumference, seam gap, registration tolerance, minimum positive and reversed line widths, and color sequence on the approved drawing. Approve physical production samples under the intended lighting; a screen image or digital proof cannot show opacity, surface gloss or tactile ink build accurately.
What temperature and humidity are required?
There is no responsible one-number answer. The acceptable environment comes from the ink technical data sheet, screen-making chemistry and substrate. The goal is stable viscosity, no condensation, controlled solvent evaporation or UV exposure, clean air and repeatable curing.
| Published example | Correct interpretation |
|---|---|
| Nazdar 2300 UV/UV-LED ink: 18–32°C | The supplier states 65–90°F (18–32°C) as the optimum ink temperature for print and cure. Colder ink becomes more viscous; hotter ink may lose definition. This is an ink-specific range, not a universal pressroom rule. |
| Marabu MGHT example: 20–25°C and 45–60% RH | These are stated ideal printing conditions for that high-temperature glass ink. They should not be copied to a different UV or solvent ink without its supplier’s approval. |
| UV work area | Control stray daylight and UV because it can begin curing ink in the screen. Keep ink covered, use suitable filters where specified and monitor lamp output rather than relying only on lamp hours. |
A useful production record includes room temperature and relative humidity; bottle and ink temperature; ink lot and mix time; dyne result; mesh, stencil and squeegee; press speed and pressure; UV intensity and dose or oven profile; and inspection results. Bottles moved from a cold warehouse should be allowed to equilibrate so invisible condensation does not become an adhesion defect.
Dust control matters as much as temperature. Separate silicone sprays, lubricants and mould-release agents from the print area. Follow each ink’s safety data sheet for ventilation, personal protective equipment, flammability and UV shielding. An odor-free cured print is desirable, but odor alone is not proof of complete cure.
How to make bottle printing durable and resistant to peeling
“Will not fade” should be converted into testable acceptance criteria. A bathroom shampoo bottle, a perfume bottle and an alcohol-based spray do not face the same chemicals or handling. The following controls have the greatest effect:
- Lock the substrate. Qualify the actual resin, recycled-content level, color, glass coating or spray paint. A change beneath the print may require revalidation.
- Measure pretreatment. Do not accept “flame treated” as evidence. For one Nazdar UV container ink, PE and PP are recommended at least 44 dynes/cm; another ink may require a different level.
- Use a matched ink system. Ink, catalyst, reducer, primer and overprint clear should come from an approved combination. A clear coat may improve abrasion resistance but cannot rescue poor base adhesion.
- Control film and cure. Mesh, stencil, squeegee and ink temperature control deposited film. For UV inks, measure irradiance and energy dose. Under-cure can produce poor adhesion, blocking, odor and weak durability; excessive cure can reduce flexibility or intercoat bonding in some systems.
- Wait before final judgment. Cool UV prints before testing and respect the full crosslinking time of two-component or solvent inks.
- Test the real use case. Combine visual inspection with scratch/abrasion, tape or cross-hatch adhesion, water and humidity exposure, and rub or immersion using the actual formula and likely contaminants. Also test squeezing or flexing for deformable bottles.
ASTM D3359 provides established tape-test methods, but ASTM also notes limitations: surface preparation and operator technique affect the result, and the methods were developed primarily for coatings on metallic substrates. Use a documented method and acceptance level agreed by buyer and supplier; do not treat an improvised tape pull as a universal certification. Boyu’s guide to tests required for cosmetic bottles shows how decoration checks fit into a broader package qualification plan.
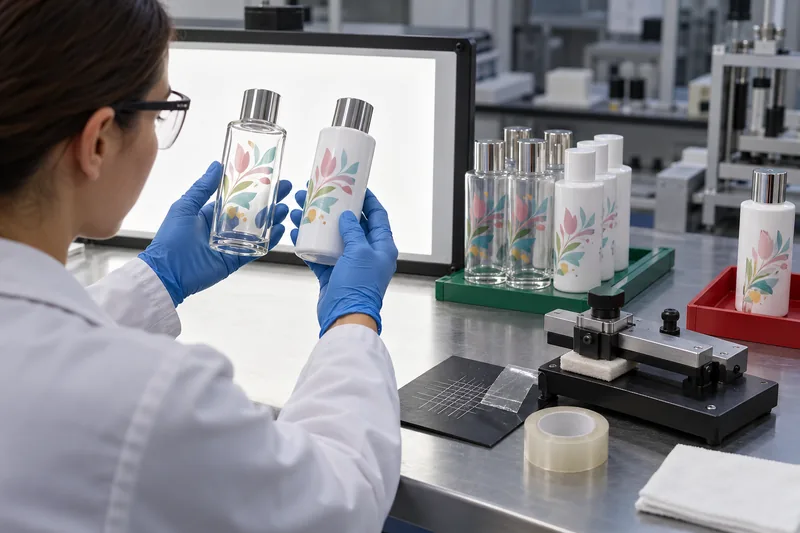
Bottle screen-printing defects: causes and corrective actions
| Defect | Likely causes and disciplined response |
|---|---|
| Ink peels in tape or scratch test | Check substrate identity, contamination, dyne level, treatment age, ink compatibility, catalyst ratio, cure energy and elapsed crosslink time. Quarantine the lot; do not simply increase flame or lamp power before locating the failure. |
| Fisheyes, pinholes or voids | Suspect silicone, oil, dust, moisture, poor wetting or air entrainment. Clean the line and fixtures, verify surface energy and control nearby aerosols. More ink rarely fixes contamination. |
| Blurred edges or smearing | Check bottle slip, excessive squeegee pressure, low ink viscosity, screen-to-bottle setting, stencil damage and insufficient flash cure. Re-establish the approved temperature and mechanical settings. |
| Double image or poor registration | Inspect the orientation datum, bottle ovality, mandrel runout, screen tension, stop position and cure between colors. Separate dimensional bottle variation from press variation before adjusting artwork. |
| Low opacity or color variation | Verify pigment mixing, viscosity, ink temperature, mesh, stencil thickness, squeegee condition, film weight and bottle background color. Compare against a physical master under defined lighting. |
| Ink dries or cures in screen | For solvent inks, check evaporation, pauses and reducer choice. For UV inks, remove stray UV/daylight and keep containers covered. Clean with the approved wash before the stencil is damaged. |
| Print cracks when bottle is squeezed | The ink film may be too brittle, over-cured, too thick or unsuitable for that resin and deformation. Qualify a more flexible ink system and test filled bottles through expected squeeze cycles. |
What should you do when the printing is wrong?
Stop the process, identify the affected time window and quarantine the bottles. Rework must be approved by quality and validated on the actual decorated substrate. A visually successful repair may still weaken adhesion, attack a coating or create stress cracking.
| Print condition | Practical disposition |
|---|---|
| Wet or not yet cured | A supplier-approved cleaner may remove the ink if it does not craze plastic or attack paint. Then clean, retreat if necessary and reprint only after a trial passes adhesion and appearance tests. |
| Cured on bare glass | Controlled chemical or mechanical stripping may be possible, but it can scratch glass, leave residue or alter coatings. Validate the stripping method and inspect every reworked bottle. |
| Cured on plastic or painted glass | Aggressive removal often damages the substrate or base coat. Rejection is frequently safer and cheaper than creating a hidden durability defect. Do not re-flame or re-bake without an approved process window. |
| Overprint or cover-up | Use only when the revised artwork, film build, color, intercoat adhesion and cure have been validated. Covering an error is not acceptable if the original print remains visible or the extra layer reduces flexibility. |
A buyer’s approval checklist
- Specify the exact bottle resin or glass/coating construction and prohibit unapproved changes.
- Approve a dimensioned decoration drawing, Pantone or physical color master, seam gap and registration tolerance.
- Request the ink family, cure method and pretreatment evidence; proprietary formulation details are not necessary, but traceability is.
- Define appearance limits for pinholes, contamination, opacity, position and color.
- Define adhesion, rub, scratch, formula, humidity and squeeze tests with conditioning time and pass/fail criteria.
- Approve decorated, filled compatibility samples before mass production—not only empty golden samples.
- Require first-off approval, periodic in-process checks, lot identification and retained samples.
- Agree in advance how rework, sorting, replacement and deviation approval will be handled.
Frequently asked questions
Is screen printing waterproof?
It can be water-resistant when the substrate, pretreatment, ink and cure are correct, but “waterproof” is not automatic. Test filled bottles after prolonged water and humidity exposure and include rubbing while wet if that matches use.
Can the same ink print both glass and plastic bottles?
Some container ink series list multiple substrates, but one formulation and cure condition should not be assumed suitable for every glass coating, PET, HDPE or PP grade. Each construction needs preliminary trials and end-use testing.
Why does screen printing pass at the factory but peel later?
Likely causes include incomplete crosslinking, formula attack, moisture, treatment decay, substrate or coating variation, bottle flexing and a test performed before the ink reached final properties. Retained samples and recorded process data help distinguish ageing from production drift.
Is UV ink always better than solvent or two-component ink?
No. UV can cure rapidly and support efficient production, but lamp spectrum, shadowing, film thickness and adhesion must be controlled. Solvent and two-component systems may suit particular substrates or resistance targets. The best system is the one validated on the actual bottle and formula.
Need a decoration trial on your actual bottle?
Send Boyu Packaging the bottle material, artwork, color count, filled formula and target tests. We can evaluate the printable area, decoration route and sample-validation plan before production specifications are frozen.
Sources and technical references
Parameters cited above are examples from named systems. Always use the current technical data sheet and safety data sheet for the ink actually purchased.
- Nazdar 2300 UV/UV-LED Screen Ink Series Technical Data Sheet.
- Nazdar 5100 Series Container Screen Ink.
- Nazdar: UV Container Ink, Intercoat Adhesion and Flame Treatment.
- Marabu Ultra Glass UVGL Technical Data Sheet.
- Marabu Mara Glass MGHT Technical Data Sheet.
- ASTM D3359-23, Measuring Adhesion by Tape Test.
- ISO 12647-5:2015, Process control for screen printing.
 English
  Español de Argentina
  Русский
  Italiano
  日本語
日本語  한국어
한국어  العربية
  Français
  Deutsch